Microsoft have added a stack of new capabilities to Office in just the last six months. Because they just appear, it’s easy to miss them, and some of these new features are really useful.
How many of these new Office features did you know about?
1. Insert Pictures in Cells in Excel
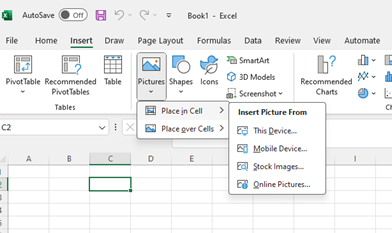
One of the most requested features by Excel users is the ability to insert pictures directly in cells, so that they become the actual cell value. This means that you can use pictures in tables, sort, filter, include them in formulas, and more. For example, you can create a product catalogue with pictures of your items, or a contact list with pictures of your colleagues.
You can also insert multiple pictures in a range of cells by selecting the range first, and then following the same steps.
To insert a picture in a cell, follow these steps:
- Select the cell where you want to insert the picture.
- Go to the “Insert” tab and click on “Pictures”.
- Choose the picture that you want to insert from your computer or online sources.
- Adjust the size and position of the picture as needed.
You can also insert multiple pictures in a range of cells by selecting the range first, and then following the same steps.
2. Share a Section of a Workbook in Excel
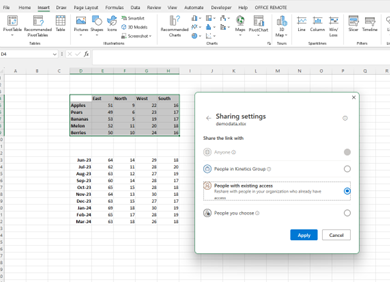
Another useful feature in Excel is the ability to share a section of a workbook, rather than the whole file, with others. This can help you protect your data and collaborate more efficiently. For example, you can share a specific range of cells, a table, or a chart with your team, without exposing the rest of the workbook.
To share a section of a workbook, follow these steps:
- Select the section that you want to share, such as a range, a table, or a chart.
- Go to the “Share” tab and click on “Copy Link”.
- Choose whether you want to allow editing or only viewing for the shared section.
- Paste the link in an email, a chat, or any other app where you want to share it.
The recipients of the link will be able to access the shared section in Excel for web, and make changes if you allowed editing.
Update: Our testing revealed an apparent bug in which impacts multi-tab spreadsheets. If there is more than one tab, the tab with the shared content operates as expected but all other tabs are shared as well.
3. Format Individual Data Points in Charts in Excel for Web
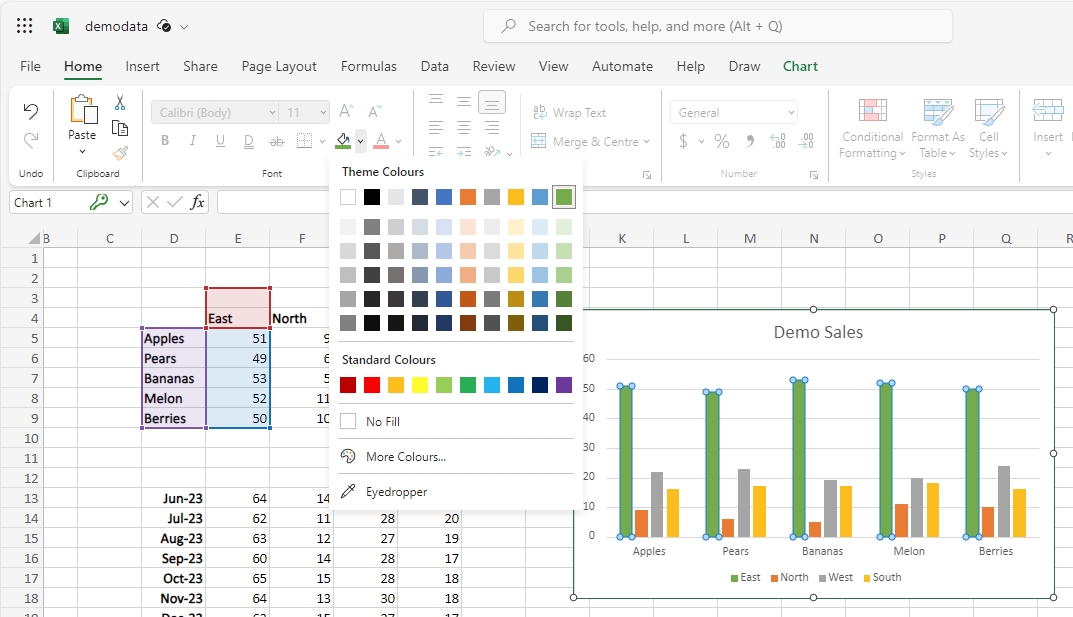
If you use Excel for web, you can now format individual data points in your charts using the Home Ribbon Controls. This can help you highlight certain data points and illustrate trends in your data. For example, you can change the color of a specific bar, column, or pie slice in your chart.
To format an individual data point in a chart, follow these steps:
- Select the chart that you want to format.
- Click on the data point that you want to format.
- Go to the “Home” tab and choose the fill colour that you want to apply.
You can also use other formatting options, such as font, alignment, and borders, to customize your data point.
4. Copy Values Quickly from the Status Bar in Excel
A handy feature in Excel is the ability to copy values quickly from the status bar. The status bar is the area at the bottom of the Excel window that shows information about the selected cells, such as the sum, average, count, and more. You can now select the value that you want to copy and move it to the clipboard. Then, you can paste it wherever you need in your workbook.
To copy a value from the status bar, follow these steps:

- Select the cells that contain the value that you want to copy.
- Right-click on the value that you want to copy in the status bar, such as the sum, average, or count.
- Click on Copy. then just paste the value in the desired location in your workbook.
5. Automatically Crop Pictures in Word, Excel, and Powerpoint for Mac
If you use Word, Excel, or Powerpoint for Mac, you can now automatically crop pictures to remove unwanted areas and focus on the most important part. This can help you improve the appearance and readability of your documents, spreadsheets, and presentations. For example, you can crop a picture of a person to show only their face, or a picture of a landscape to show only the horizon.
To automatically crop a picture, follow these steps:
- Select the picture that you want to crop.
- Go to the “Picture Format” tab and click on Crop.
- Choose Auto Crop from the drop-down menu.
- Adjust the cropped area as needed.
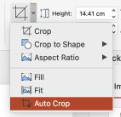
You can also use other cropping options, such as aspect ratio, shape, and fill, to customize your picture.
6. New Default Theme for Office
Microsoft has refreshed the Office theme with a new default font, colour palette, style, and line weights that help you make your documents more modern and accessible.
The new default font is Calibri Light, which is a sans-serif font that is easy to read and suitable for various purposes. The new colour palette is based on the Fluent Design System, which is a set of design principles that create a consistent and harmonious user experience across Microsoft products.
The new style and line weights are intended to create a clear and elegant visual hierarchy in your documents.
To apply the new default theme to your documents, follow these steps:
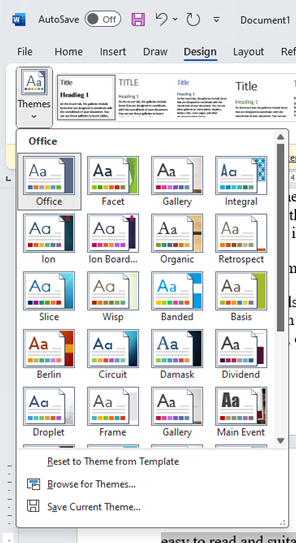
- Go to the “Design” tab and click on “Themes”.
- Choose Office from the drop-down menu.
You can also use other themes, such as Dark Gray, Colorful, or Custom, to personalize your documents.
7. Insert Photos from Android Phone in Word, Excel, and Powerpoint
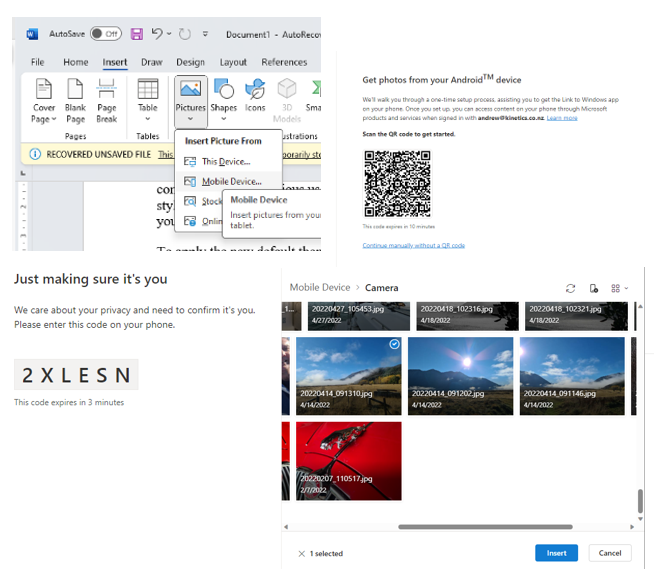
If you use Word, Excel, or Powerpoint on your Android phone, you can now easily transfer photos from your phone to your documents on Windows. This can help you save time and avoid the hassle of emailing or uploading photos to your computer. For example, you can take a photo of a receipt, a diagram, or a whiteboard with your phone, and insert it directly into your document.
To insert a photo from your Android phone, follow these steps:
- Open the document where you want to insert the photo on your Windows computer.
- Go to the “Insert” tab and click on “Pictures“.
- Choose “Mobile Device” from the drop-down menu.
- Scan the QR code that appears on your computer screen with your phone’s camera.
- Select the photo that you want to insert from your phone’s gallery.
- Tap on “Send“.
The photo will be inserted into your document on your computer.
8. PowerPoint Ink Replay
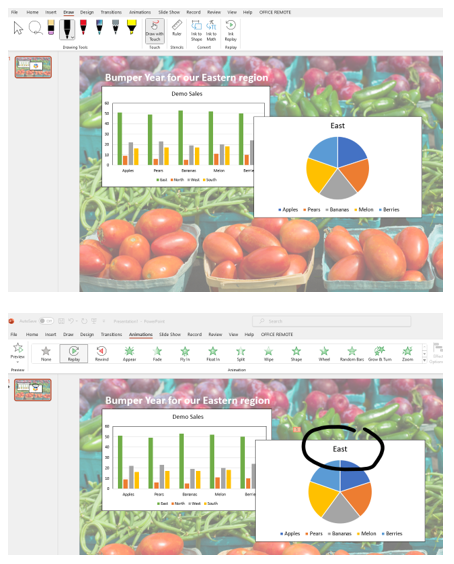
If you want to highlight an image on a PowerPoint slide, experiment with ‘draw’.
This is especially effective if you use a stylus or digital pen.
When you present the slides, you can have PowerPoint ‘replay’ your pen marks as if you did them in real time in the presentation.
To use ink replay, follow these steps:
- Prepare your slide.
- Go to the “Draw” tab and select a pen.
- Draw your pen markings on the screen with a stylus or mouse.
- Select the pointer icon on the draw menu to stop drawing.
- Open the ‘animation’ tab and select “replay”.
These are some of the top features that have been added to Word, Excel, Powerpoint and Office in the last few months. They are designed to help you create, collaborate, and communicate more effectively and efficiently.
